CastIQ Support

Get more from CastIQ.

This guide walks through the main parts of CastIQ and shows how to use the app to record your fishing, understand your results, and build useful data over time.

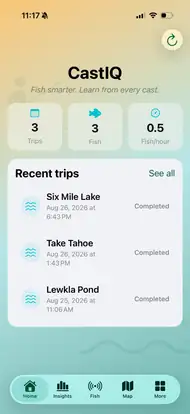
CastIQ Home screen
01

Home

The Home screen is your landing page whenever you open CastIQ. It gives you a quick view of your fishing history without having to dig through menus.

  • See the number of fishing trips you have recorded.
  • See your total fish caught and your overall fish-per-hour rate.
  • Review your recent trips in one place.
  • Tap any trip to open its full trip details.
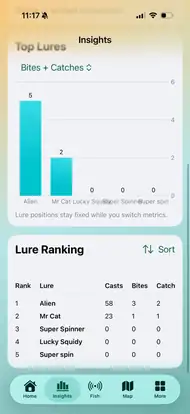
CastIQ Insights screen
02

Insights

Insights is the main analytics area of CastIQ — and the reason consistent trip and lure tracking becomes valuable. It turns the information you record into a clearer picture of what is working for you.

  • Review a summary of your fishing trips and results.
  • See your top-performing lures and lure rankings.
  • Filter the analysis by all fish or a specific species.
  • Filter by all waterways or one specific waterway.
  • View all years together or select an individual year.
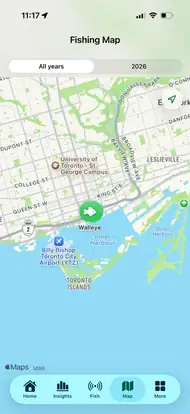
CastIQ map showing catch locations
03

Map

Use the fishing map to review the places where you have caught fish and quickly return to productive areas.

  • View your recorded catch locations on the map.
  • Tap a fish marker to see the details for that catch.
  • If several catches are recorded in the same area, open the marker to see the list of fish caught there.
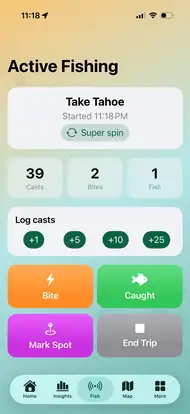
CastIQ Active Fishing screen
04

Active Fishing

Active Fishing is designed for quick on-the-water entry. The more consistently you record casts, bites and catches, the more useful your lure analytics become later.

  1. Start a fishing session using Start Fishing from the Fish menu.
  2. Make sure the lure you are using is selected.
  3. Tap Cast each time you cast, or use the +5, +10 and other quick-add controls if you prefer to enter several casts at once.
  4. If you get a bite but do not land the fish, add your latest casts first and then tap Bite.
  5. When you land a fish, add your latest casts first and then tap Caught.
  6. Use Mark Spot for a location you want to return to.
  7. Tap End Trip when your fishing session is finished.

Common questions

CastIQ Q&A

How do I add a lure?

Go to More → Lures, then tap the + button in the top-right corner.

How do I edit a lure?

Go to More → Lures, tap the three-dot menu beside the lure you want to change, then choose Edit.

How do I delete a lure?

CastIQ does not delete lures because doing so could break your historical fishing data. Instead, deactivate the lure so it no longer appears as an option in future fishing sessions while its past results remain intact.

How do I add a waterway?

Go to More → Lakes & Waterways, then tap the + button in the top-right corner.

How do I edit a waterway?

Go to More → Lakes & Waterways, then tap the chevron beside the waterway you want to edit.

How do I add a type of waterway that CastIQ does not already have?

Go to More → Lakes & Waterways and tap the + button. In Create another type, enter the new waterway type you need — for example, Lagoon.

How do I add or edit a fish species?

To add one, go to More → Fish Species and tap the + button in the top-right corner. To edit an existing species, open More → Fish Species and tap the chevron beside the species you want to change.

How do I adjust the contrast?

Go to More → Contrast and select the contrast style you prefer.

How do I switch between metric and imperial units?

Go to More → Settings and change the Units field.

How do I back up or restore my data?

Go to More → Settings and use Save a Backup or Restore a Backup.